Last week I shared some fun ways that I use kaleidoscopes in quilt designs. In
Part 1 I showed how I create kaleidoscopes using
Kaleidoscope Kreator, then import them back into the program to create a new look. In
Part 2 I showed how to use a kaleidoscope with a simple layer to create a medallion center for a quilt.
As easy and fun as those two techniques are, what I most enjoy is using kaleidoscopes as part of digital collages. When I made my DVD,
Digital Collage for Quilt Design, the one thing that I most wanted folks to take away from it was that you can use
any image - photo, scanned documents or objects, drawings, paintings etc. - as part of a digital collage. If you look at my quilts (
here and
here) you'll see that I certainly use photographs in my collages, but also a variety of other image types.
Using a variety of image types in your digital collages can add texture, depth, and a more painterly looking result. It's really a way to personalize your art! In all the examples below I imported the kaleidoscopes into Photoshop and combined them with other images.
So how have I used kaleidoscopes in digital collages? Let's see
 |
| This background was created by heavily manipulating a feathered kaleidoscope, then copying it three times and arranging the images in a square. |
 |
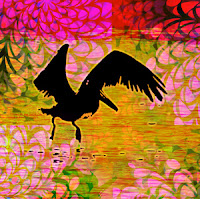
| Here the kaleidoscope has been cropped and used as a background for a silhouette. It's a very graphic look. |
 |
| Again, a heavily manipulated kaleidoscope used as a background. Doesn't it remind you of a batik? |
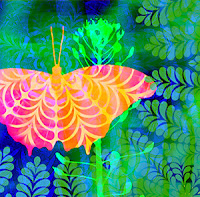 |
| Using various transparencies for the kaleidoscope layers creates a fill for the butterfly, as well as the "frame" of feathers. |
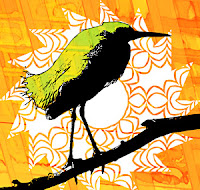 |
| The "fancy" part of the background kaleidoscope was selectively removed, leaving a graphic, sun like design. |
 |
| Yet another heavily manipulated kaleidoscope forms the background. |
 |
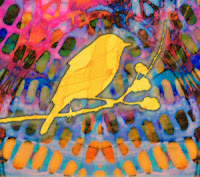
| The "sprig" layer is placed on a kaleidoscope background. Because of the transparency of the "sprig" layer the background acts as a fill for the buds. I could easily extract the black background and use this design element on a different composition. |
I love symmetry, but for my collages my focal point is generally not the kaleidoscope. As you can see I instead use them as background elements, fills, or textures. The framing effect a kaleidoscope can add to a composition is particularly appealing to me.
I hope you've enjoyed this series of posts - they were certainly fun for me! I'd love to hear how you use kaleidoscopes in your quilts too.


3 comments:
Received my video and am anxious to try your tech out. Looks complicated, bt I'll try.
So beautiful.
Barb
Thanks Barb, I hope you enjoy the DVD! I'm sure you'll do great - just be sure to save anything you like. I approach the process as a time to play and experiment - have fun with it!
I love what you are doing in photoshop!! That's what I want to do. I've been trying really hard to put in the time to learn it, but there is so much. I guess I'll just have to "play" more. Thank you for a great blog.
Post a Comment